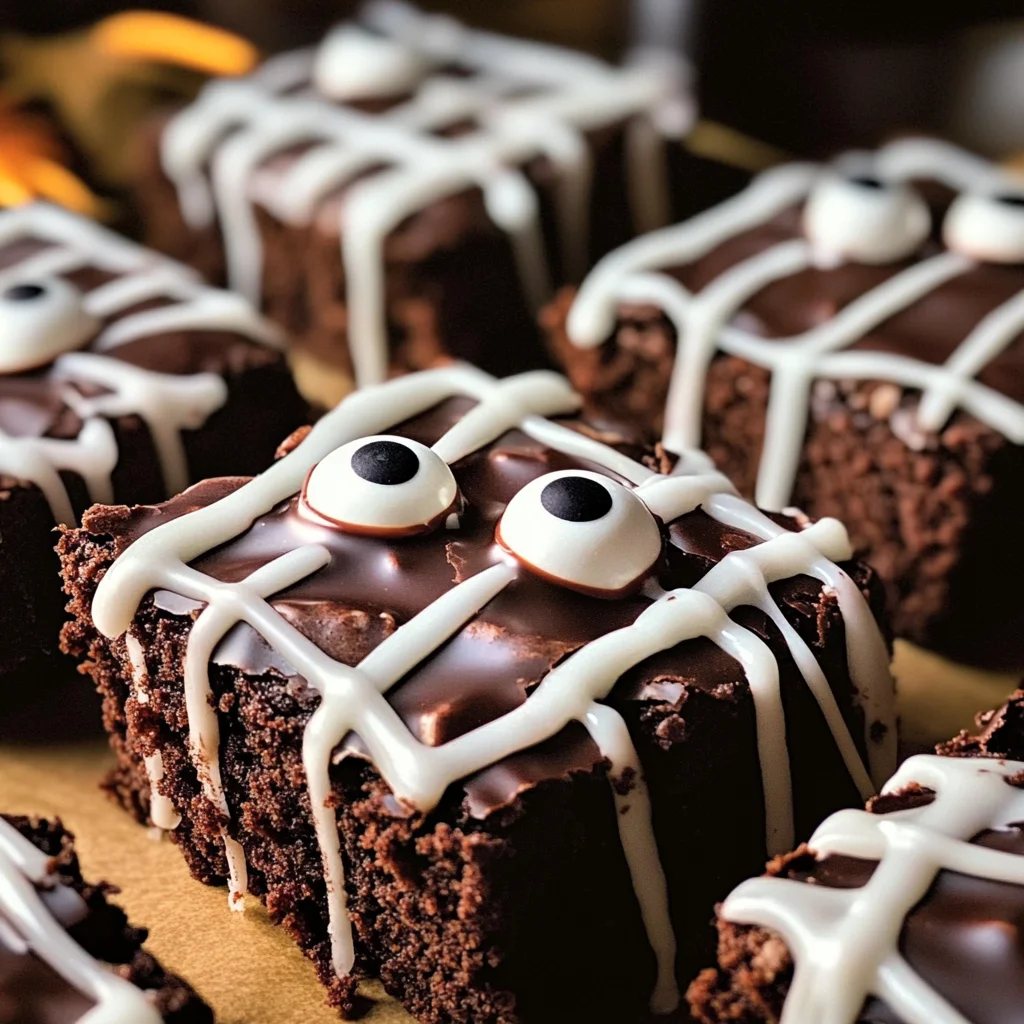
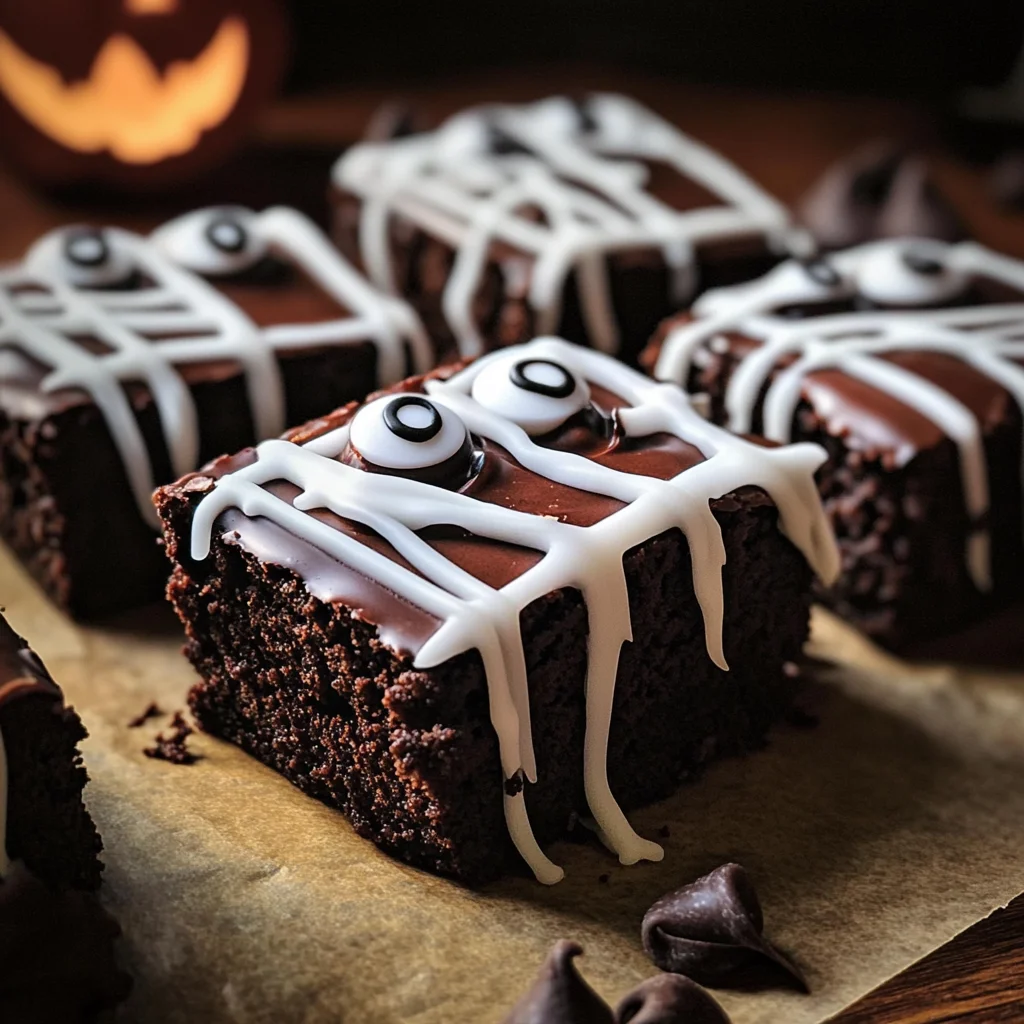
spooky mummy brownies
If you’re looking for a fun and festive treat this Halloween, these spooky mummy brownies are just what you need! They’re not only deliciously rich and chocolaty but also adorable enough to delight kids and adults alike. The combination of fudgy brownies and whimsical icing makes them a perfect centerpiece for any fall gathering, family movie night, or school party. I promise, once you try these brownies, they will become a beloved tradition in your home.
Imagine serving these cute little mummies to your friends at a Halloween get-together. Everyone will love how easy they are to make, and trust me, they won’t last long on the dessert table!
Why You’ll Love This Recipe
- Easy preparation: These spooky mummy brownies come together quickly with simple steps, making them perfect for beginner bakers.
- Family-friendly appeal: Kids love the fun designs, and they can even help decorate! It’s a great way to get them involved in the kitchen.
- Delicious flavor: Rich chocolate brownies topped with creamy icing create a delightful treat that everyone will enjoy.
- Perfect for any occasion: Whether it’s Halloween or just a cozy fall evening, these brownies are sure to impress.
Ingredients You’ll Need
You won’t believe how simple and wholesome the ingredients are for these spooky mummy brownies! Get your mixing bowls ready because you’re about to make some magic in the kitchen.
Ingredients:
– 10 tbsp butter
– 1 1/2 cups dark chocolate chips or chunks
– 1 cup sugar
– 1/4 cup dark brown sugar
– 3 eggs, at room temperature
– 1 tsp espresso powder (optional)
– 2 tsp vanilla extract
– 3/4 cup all-purpose flour
– 1/3 cup unsweetened cocoa powder
– 1/2 tsp baking powder
– 1/2 tsp kosher salt
– 1 package candy eyes
– 20 oz semi-sweet or milk chocolate chips
– 1 tbsp coconut oil
– 1 cup powdered sugar
– 2-3 tbsp heavy cream, to thin
Variations
The great thing about spooky mummy brownies is their flexibility! You can easily customize them to suit your taste or dietary needs.
- Add some crunch: Mix in chopped nuts or crushed pretzels into the brownie batter for an extra texture.
- Switch up the chocolate: Use white chocolate chips instead of semi-sweet for a different flavor profile.
- Make it gluten-free: Substitute all-purpose flour with a gluten-free blend to cater to gluten-sensitive friends.
- Go wild with toppings: Top with colorful sprinkles or edible glitter for an extra festive touch!
How to Make spooky mummy brownies
Step 1: Prep Your Pan
Preheat your oven to 350 degrees. Line a 9 x 9 inch cake pan with parchment paper so it hangs over the edges. This will make it super easy to lift out the brownies later!
Step 2: Melt Butter and Chocolate
In a microwave-safe bowl, heat 1 cup of dark chocolate chips along with the butter for one minute. Stir until smooth. If necessary, give it another quick burst in the microwave. Mixing until smooth is key; it ensures that all flavors meld beautifully together.
Step 3: Beat Those Eggs
In a stand mixer bowl, beat the eggs vigorously until frothy—about 2–3 minutes should do it! This step helps incorporate air into your batter, making those brownies nice and fluffy.
Step 4: Combine Ingredients
With the mixer running, slowly pour in that luscious chocolate mixture. Blend until smooth before adding espresso powder (if using) and vanilla extract. Next up, fold in all-purpose flour, cocoa powder, baking powder, and salt until just combined—don’t overmix!
Step 5: Bake Those Brownies
Spread your brownie batter evenly into the prepared pan using a spatula. Bake for about 25–30 minutes until an inserted toothpick comes out with just a few moist crumbs. Allow them to cool completely; this makes cutting easier.
Step 6: Chill Out
Once cooled, cut into squares (9 large or 12 small) and pop them in the freezer for about 15 minutes. Chilling helps set everything before dipping!
Step 7: Coat in Chocolate
In another microwave-safe bowl, combine semi-sweet or milk chocolate chips with coconut oil. Heat until melted and smooth—this coating adds richness and helps create that iconic mummy look!
Step 8: Create Bandage Icing
For those cute bandages on your mummies, whisk together powdered sugar with heavy cream until thick but spreadable. Transfer this icing into a zip-top bag or pastry bag for easy decorating.
Step 9: Decorate Your Mummies
After chilling again for about 15 minutes post-dip, remove the brownies from the fridge. Use your icing bag to draw crisscross patterns across each brownie and attach candy eyeballs right away before it sets!
Let those adorable mummies harden for about ten minutes—and then you’re ready to dig in! Enjoy every bite of these delightful spooky mummy brownies; they’re sure to bring smiles all around!
Pro Tips for Making spooky mummy brownies
Making spooky mummy brownies can be a delightful experience, and these tips will help you achieve the best results!
- Use room temperature eggs – Room temperature eggs incorporate better into the batter, resulting in a fluffier texture. This can make your brownies rise nicely and have a lighter bite.
- Don’t overmix the batter – Once you’ve added the dry ingredients, mix just until combined. Overmixing can lead to tough brownies instead of the desired fudgy texture.
- Cool before cutting – Letting your brownies cool completely before cutting them helps maintain their shape. If you cut them while warm, they may crumble or fall apart.
- Experiment with chocolate types – While this recipe calls for dark chocolate chips, feel free to use semi-sweet or even milk chocolate for a sweeter option. Each type of chocolate will bring a unique flavor profile to your brownies.
- Have fun with decorations – Let your creativity shine when applying the icing and candy eyes! You can create different expressions or designs, making each brownie unique and even more fun for Halloween parties.
How to Serve spooky mummy brownies
Presenting your spooky mummy brownies can be as fun as making them! Here are some ideas to elevate your dessert table.
Garnishes
- Sprinkles: Add some festive sprinkles on top of your bandage icing for an extra pop of color and texture that enhances the Halloween theme.
- Whipped Cream: A dollop of whipped cream on the side adds a creamy contrast to the rich chocolate flavor. It’s also visually appealing!
- Chocolate Shavings: Grate some chocolate over the top of the finished brownies for an elegant touch that complements their rich taste.
Side Dishes
- Vanilla Ice Cream: A scoop of vanilla ice cream pairs perfectly with the fudgy brownies, offering a delightful contrast in temperature and texture.
- Fresh Berries: Serve with a side of fresh strawberries or raspberries; their tartness balances out the sweetness of the brownies beautifully.
- Pumpkin Spice Latte: For a cozy drink option, pair these brownies with a warm pumpkin spice latte—a perfect combination for fall gatherings.
- Hot Apple Cider: This warm beverage provides a comforting seasonal touch that complements the flavors of chocolate and spices in your spooky mummy brownies.
Now you’re all set to impress friends and family with these adorable treats! Enjoy every delicious bite while celebrating Halloween in style.
Make Ahead and Storage
These spooky mummy brownies are perfect for meal prep, making them a fun treat to have on hand for Halloween gatherings or cozy nights at home! You can whip up a batch ahead of time and store them for later enjoyment.
Storing Leftovers
- Store brownies in an airtight container at room temperature for up to 3 days.
- For longer freshness, place them in the fridge where they will last up to a week.
Freezing
- Cut brownies into individual pieces before freezing for easier access.
- Wrap each brownie tightly in plastic wrap, then place them in a freezer-safe bag or container.
- They can be frozen for up to 3 months.
Reheating
- To enjoy them warm, microwave a brownie on a microwave-safe plate for about 10-15 seconds until just warmed through.
- Alternatively, you can reheat them in a preheated oven at 350°F (175°C) for about 5-7 minutes.
FAQs
Here are some common questions you might have about making these delightful treats!
Can I make spooky mummy brownies without espresso powder?
Absolutely! The espresso powder is optional and enhances the chocolate flavor, but you can omit it if you prefer. Your brownies will still be delicious!
What makes spooky mummy brownies so special?
Spooky mummy brownies are not only visually appealing with their adorable bandage icing and candy eyes, but they also deliver rich chocolate flavor that delights all ages. They’re perfect for Halloween celebrations!
How do I get the bandage icing just right?
To achieve the best consistency for your bandage icing, whisk together powdered sugar with heavy cream until it resembles thick glue. This will allow you to create nice crisscross patterns on your brownies.
Can I substitute the chocolate types used in spooky mummy brownies?
Yes! You can use any type of chocolate chips you prefer, whether semi-sweet, milk chocolate, or dark chocolate. Just remember that this may slightly alter the sweetness of your final product.
Final Thoughts
I hope you enjoy making these spooky mummy brownies as much as I do! They’re not only a fun project but also a delicious way to celebrate the season. Don’t hesitate to share this treat with friends and family; their smiles will be as sweet as the brownies themselves. Happy baking, and have a spooktacular time!
Spooky Mummy Brownies

Get ready to create a delightful Halloween treat that brings smiles all around with these spooky mummy brownies! With their rich, fudgy chocolate base and whimsical icing, these brownies are not only delicious but also a fun project for the whole family. The adorable mummy design featuring candy eyes makes them perfect for any fall gathering, school party, or family movie night. Simple to prepare and irresistibly tasty, these treats will quickly become a cherished tradition in your home.
- Prep Time: 20 minutes
- Cook Time: 30 minutes
- Total Time: 50 minutes
- Yield: Approximately 12 servings 1x
- Category: Dessert
- Method: Baking
- Cuisine: American
Ingredients
- 10 tbsp butter
- 1 1/2 cups dark chocolate chips or chunks
- 1 cup sugar
- 1/4 cup dark brown sugar
- 3 eggs, at room temperature
- 1 tsp espresso powder (optional)
- 2 tsp vanilla extract
- 3/4 cup all-purpose flour
- 1/3 cup unsweetened cocoa powder
- 1/2 tsp baking powder
- 1/2 tsp kosher salt
- 1 package candy eyes
- 20 oz semi-sweet or milk chocolate chips
- 1 tbsp coconut oil
- 1 cup powdered sugar
- 2–3 tbsp heavy cream, to thin
Instructions
- Preheat your oven to 350°F. Line a 9×9 inch baking pan with parchment paper.
- In a microwave-safe bowl, melt butter and dark chocolate chips until smooth.
- Beat eggs in a stand mixer until frothy, then pour in the chocolate mixture along with vanilla extract.
- Gradually add flour, cocoa powder, baking powder, and salt; mix until just combined.
- Spread batter into the prepared pan and bake for 25–30 minutes until a toothpick comes out with moist crumbs. Cool completely.
- Once cooled, cut into squares and freeze for 15 minutes.
- Melt semi-sweet chocolate chips with coconut oil and coat each brownie.
- Whisk powdered sugar with heavy cream for bandage icing; decorate brownies and add candy eyes.
Nutrition
- Serving Size: 1 serving
- Calories: 210
- Sugar: 16g
- Sodium: 90mg
- Fat: 11g
- Saturated Fat: 6g
- Unsaturated Fat: 4g
- Trans Fat: 0g
- Carbohydrates: 28g
- Fiber: 2g
- Protein: 2g
- Cholesterol: 35mg